【Three.js】オフスクリーンレンダリングに挑戦

【やらいでか】
意欲満々な様。江戸っ子が"やらずにいられようか"と感じた時に発する掛け声に類する語。
はじめに
オフスクリーンレンダリングというのは、ディスプレイ上ではなくメモリ上に映像を描画することです。
この技術を使えば「テレビの3Dモデル上で映像を流す」なんて事もできてしまうワケですね。やらいでか。
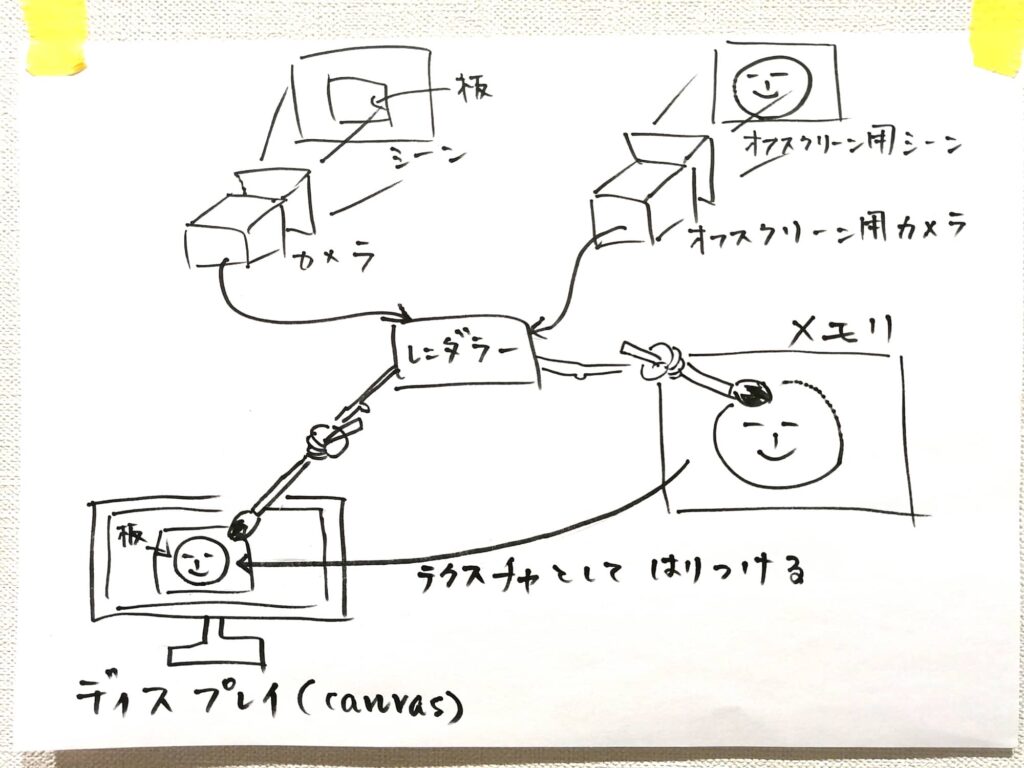
オフスクリーンレンダリングのイメージ図
たぶんこんな感じです↓。

シーンとカメラは2個ずつ必要になるワケですね。それぞれのカメラで撮った映像を、一方はディスプレイに、もう一方はメモリに描き込みます。メモリに描き込んだ映像は、ディスプレイに描き込む際にテクスチャとして使用することができます。
今回は、メモリ上に描き込むものとして、前回作った赤ちゃんとリボンの映像を使います。
オフスクリーンレンダリングの準備あれこれ
//*****************************************
// オフスクリーンレンダリングあれこれ
//*****************************************
function offscreenRendering() {
  //レンダーターゲット
  renderTarget = new THREE.WebGLRenderTarget(2048, 2048);

  //オフスクリーン用シーン
  offScene = new THREE.Scene();

  //オフスクリーン用カメラ
  offCamera = new THREE.PerspectiveCamera(45, 1, 1, 10000);
  offCamera.position.set(0, 10, 20);

  //赤ちゃんパネルとリボン
  createPanel();
  createLine();
}オフスクリーンレンダリングに関する準備をするoffscreenRendering関数を作りました。
まずはWebGLRenderTargetクラスでレンダーターゲットを作ります。メモリ上に描き出した映像はこのレンダーターゲットに映し出されます。コンストラクタに渡すのは横幅と高さ。この値があんまり小さいと映像が粗くなります。
シーンとカメラはいつも通りの作り方で大丈夫。
赤ちゃんとリボンはオフスクリーン用のシーンに追加します↓。
//*****************************************
// 赤ちゃんパネルを作る
//*****************************************
function createPanel() {

  // 画像を読み込む
  const textureLoader = new THREE.TextureLoader();
  const backTexture = textureLoader.load("./picture/ribon/back.jpg");
  const frontTexture = textureLoader.load("./picture/ribon/front.png");

  // 後ろ側のパネル
  const backGeo = new THREE.PlaneGeometry(10, 10);
  const backMat = new THREE.MeshBasicMaterial({map: backTexture});
  const back = new THREE.Mesh(backGeo, backMat);
  back.position.set(0, 10, 0);
  offScene.add(back);

  // 手前側のパネル
  const frontGeo = new THREE.PlaneGeometry(10,10);
  const frontMat = new THREE.MeshBasicMaterial({map: frontTexture, transparent: true});
  const front = new THREE.Mesh(frontGeo, frontMat);
  front.position.set(-0.05, 10, 0.5);
  offScene.add(front);
}

//*****************************************
// リボンを作る
//*****************************************
function createLine() {
  for (let i = 0; i < 10; i++) {
    const points = [];

    points.push(new THREE.Vector3(20, 8 + i * 0.01, 20));
    points.push(new THREE.Vector3(15, 7 + i * 0.01, 15));
    points.push(new THREE.Vector3(10, 6.5 + i * 0.01, 10));
    points.push(new THREE.Vector3(5, 8 + i * 0.01, 4));
    points.push(new THREE.Vector3(3, 9.3 + i * 0.01, 0.1));
    points.push(new THREE.Vector3(1.3, 9.2 + i * 0.01, 0.5));
    points.push(new THREE.Vector3(1.2, 8.9 + i * 0.01, 1));
    points.push(new THREE.Vector3(2, 8.7 + i * 0.01, 1.4));
    points.push(new THREE.Vector3(3.0, 9.1 + i * 0.01, 1.2));
    points.push(new THREE.Vector3(3.2, 9.8 + i * 0.01, 0.5));
    points.push(new THREE.Vector3(2.5, 10.3 + i * 0.01, 0.02));
    points.push(new THREE.Vector3(0, 10.6 + i * 0.01, 1));
    points.push(new THREE.Vector3(-5, 10.5 + i * 0.01, 1.5));
    points.push(new THREE.Vector3(-10, 11.5 + i * 0.01, 1.5));
    points.push(new THREE.Vector3(-15, 13.5 + i * 0.01, 1.5));
    points.push(new THREE.Vector3(-20, 14.8 + i * 0.01, 1.5));

    const curve = new THREE.CatmullRomCurve3(points);
    const curvePoints = curve.getPoints(200);

    const geo = new THREE.BufferGeometry().setFromPoints(curvePoints);
    const mat = new THREE.LineBasicMaterial({color: 0xf03ef0});
    const line = new THREE.Line(geo, mat);
    lines.push(line);
    offScene.add(line);
  }
}
リボンを動かすための関数はコレ↓。
//*****************************************
// リボンを動かす
//*****************************************
function moveLine() {
  for (let i = 0; i < 10; i++) {
    lines[i].geometry.setDrawRange(start[i], count[i]);
    count[i] += 1;

    if (count[i] > 100) {
      start[i] += 1;
    }
    if (start[i] > 201) {
      count[i] = 0;
      start[i] = 0;
    }
  }
}
通常のレンダリング(ディスプレイへのレンダリング)の準備あれこれ
//*****************************************
// 通常のレンダリング準備あれこれ
//*****************************************
function init() {
  //シーン
  scene = new THREE.Scene();

  //カメラ
  aspRatio = window.innerWidth / window.innerHeight;
  fov = getFov(aspRatio);
  camera = new THREE.PerspectiveCamera(fov, aspRatio, 1, 10000);
  camera.position.set(0, 20, 100);

  //レンダラー
  webGLRenderer = new THREE.WebGLRenderer();
  webGLRenderer.setSize(window.innerWidth, window.innerHeight);
  document.getElementById("screen").appendChild(webGLRenderer.domElement);

  //オフスクリーンレンダリングあれこれ関数を呼ぶ
  offscreenRendering();

  //この板に赤ちゃんとリボンの映像が映し出される
  const planeGeo = new THREE.PlaneGeometry(10, 10, 1, 1);
  const planeMat = new THREE.MeshBasicMaterial({map: renderTarget.texture, side: THREE.DoubleSide});
  const plane = new THREE.Mesh(planeGeo, planeMat);
  plane.position.set(0, 10, 0);
  scene.add(plane);
}通常のレンダリングの準備をするinit関数を作りました。
この中で作っているシーンとカメラは通常のレンダリング用のものです。
23行目以降で作っているのは一枚の板です。コイツのmapプロパティにさっき作ったrenderTargetのtextureプロパティを設定してあげましょう。そうするとメモリ上に描き出された映像は、この板に映し出される事になります。
描画する
//*****************************************
// 描画
//*****************************************
function renderScene() {
  requestAnimationFrame(renderScene);

  //メモリ上に描き出す
  webGLRenderer.setRenderTarget(renderTarget);
  webGLRenderer.render(offScene, offCamera);

  //ディスプレイ上に描き出す
  webGLRenderer.setRenderTarget(null);
  webGLRenderer.render(scene, camera);

  //リボンを動かす
  moveLine();
}webGLRendererのsetRenderTargetメソッドにrenderTargetを指定します。そうすると、これ以降のレンダリングはメモリ上に行われます。オフスクリーン用のシーンとカメラを使ってレンダリングしましょう。
その後、setRenderTargetメソッドにnullを指定して通常のレンダリング処理を行います。
そうするとこうなります↓。
あとがき
なんともややこしいモノでした。
現実の世界で例えるなら「テレビ番組を撮影しているカメラの映像」と「その映像が映し出されたテレビを見ている目に映る映像」といった所でしょうか。今回は以上です。ありがとうございました。
おしゃれ度
★☆☆☆☆

ディスカッション
コメント一覧
まだ、コメントがありません